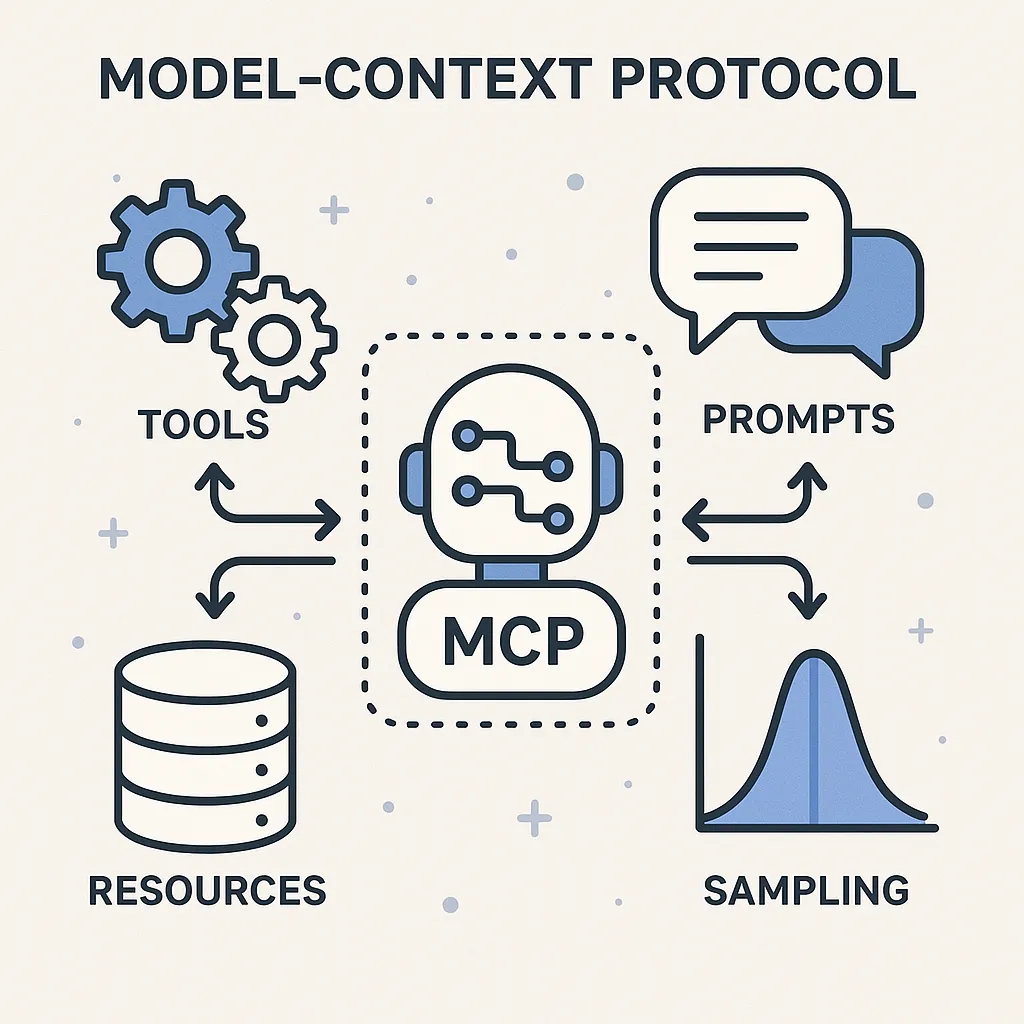
MCP 主要有下列四個功能類型,分別對應著不同的使用情景

工具(Tools)
工具是AI模型可以通過MCP協議調用的可執行函數或行動。
- 控制:工具通常是由模型控制的,意味著AI模型(LLM)根據用戶的請求和上下文決定何時調用它們。
- 安全性:由於工具執行具有副作用的操作的能力,因此工具的執行可能會很危險。因此,它們通常需要用戶的明確批准。
範例:取得給定位置的當前天氣資料的天氣工具:
def  get_weather ( location: str ) -> dict :
     """取得指定位置的目前天氣。"""
    # 連接到天氣 API 並取得資料
    return {
         "temporary" : 72 ,
         "conditions" : "Sunny" ,
         "humidity" : 45
    }
資源(Resources)
資源是AI模型可以訪問唯讀的數據源。
- 控制應用程式控制:資源由應用程式控制,這意味著主機應用程式通常決定何時存取它們。
- 安全性:由於它們是唯讀的,因此它們的安全風險通常比工具低。
實例:存取檔案內容、檢索資料庫記錄、讀取設定資訊。 範例:提供對文件內容的存取的資源:
def  read_file ( file_path: str ) -> str :
     """讀取指定路徑下檔案的內容。"""
    with  open (file_path, 'r' ) as f:
         return f.read()
提示詞(Prompts)
提示詞是可重用的指令段,用於指導AI模型執行特定任務。
- 控制使用者控制:提示由使用者控制,通常作為主機應用程式 UI 中的選項呈現。
- 目的:想辦法將使用工具以及資源的方式最佳化。
- 選擇:使用者通常在 AI 模型開始處理之前撰寫提示詞。
- 用例:常見的工作流程、專門的任務範本、引導式互動。
範例:審查程式碼
def code_review(code: str, language: str) -> list:
    """Generate a code review for the provided code snippet."""
    return [
        {
            "role": "system",
            "content": f"You are a code reviewer examining {language} code. Provide a detailed review highlighting best practices, potential issues, and suggestions for improvement."
        },
        {
            "role": "user",
            "content": f"Please review this {language} code:\\n\\n```{language}\\n{code}\\n```"
        }
    ]
取樣(sampling)
採樣允許伺服器請求客戶端(具體來說,主機應用程式)執行 LLM 互動。
- 控制:採樣由伺服器發起。但需要客戶端/主機的設備協助。
- 目的:它支援伺服器驅動的代理行為和多步驟互動。
- 用例:複雜的多步驟任務、自主代理工作流程、互動式流程。
範例:伺服器可能會請求客戶端分析其已處理的資料:
def request_sampling(messages, system_prompt=None, include_context="none"):
    """Request LLM sampling from the client."""
    # In a real implementation, this would send a request to the client
    return {
        "role": "assistant",
        "content": "Analysis of the provided data..."
    }
sequenceDiagram
participant Server as "`伺服器 (Server)`"
participant Client_Host as "`主機/客戶端 (Client/Host)`"
participant LLM_Engine as "`LLM引擎 (LLM Engine)`"
participant User_Interface as "`使用者介面 (User Interface)`"
Note right of Server: "`MCP Sampling 類比: 助理(伺服器)正在為您規劃先前交代的複雜旅行。TA蒐集了航班和飯店資訊後,反過來問您(主機/LLM):「老闆,根據這些資訊,先去A城市還是B城市比較合理?」「或者您對這個行程草案有什麼修改意見?」然後助理會根據您的「思考結果」繼續完善行程。`"
Server->>Client_Host: "`老闆,關於您先前交代的旅行規劃,我整理了初步的行程資訊,請您看看,給點意見或做個決策? (sampling/createMessage 請求)`"
Client_Host->>User_Interface: "`(可選) 助理傳來了行程草案,您看一下是否需要調整? (呈現請求供使用者審查/修改)`"
User_Interface-->>Client_Host: "`(可選) 我覺得可以這樣調整... (使用者審查結果/修改內容)`"
Note over Client_Host, LLM_Engine: "`您(主機)開始思考/讓LLM分析`"
Client_Host->>LLM_Engine: "`根據助理給的資訊和我的想法,分析一下最佳方案或產生修改意見。 (將請求內容傳遞給LLM引擎進行處理)`"
LLM_Engine-->>Client_Host: "`分析結果:建議先去B城市,並優化住宿選擇... (LLM處理結果)`"
Client_Host->>User_Interface: "`(可選) 這是思考後的方案,您最終確認一下? (呈現LLM結果供使用者審查/確認)`"
User_Interface-->>Client_Host: "`(可選) 好的,就這麼辦! (使用者確認/修改LLM結果)`"
Note over Client_Host, Server: "`您(主機)將最終決策告知助理`"
Client_Host->>Server: "`好的助理,我們決定先去B城市,並按照這個方案調整。 (返回最終的LLM處理結果)`"
Note over Server: "`助理(伺服器)接收決策,繼續完善旅行計劃`"
部署anaconda環境
Anaconda環境下使用UV的用途與安裝教學
UV 是一款由 Rust 編寫的現代化 Python 套件與專案管理器,具備極高的安裝速度與完善的依賴管理功能。即使在 Anaconda 環境下,也可以利用 UV 來提升依賴解析與安裝效率,並享受更一致的跨平台體驗。
用途說明
- 在 Anaconda 虛擬環境中,UV 可作為 pip 的高速替代品,負責套件安裝、依賴鎖定與虛擬環境管理
- UV 支援 requirements.txt、pyproject.toml 等主流格式,並能自動建立 .venv 標準虛擬環境
- 適合需要快速安裝大量依賴、追求跨平台一致性或團隊協作的 Python 專案
安裝 UV(pip 方式)
- 進入 Anaconda 虛擬環境:
conda activate <your_env_name>
- 使用 pip 安裝 uv:
pip install uv
- 驗證安裝:
uv --version
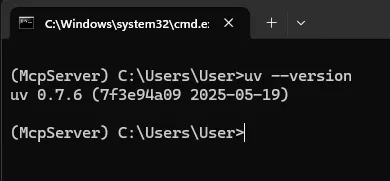
UV 兼容 pip 的大部分命令,並能顯著提升安裝速度與依賴管理體驗。建議在新專案或需要高效依賴管理的場景下優先考慮 UV。
使用UV安裝MCP套件
首先進入Anaconda prompt,輸入
uv init
uv venv
source .venv/bin/activate
// or comment below
// .venv/bin/activate
接著安裝 mcp套件
uv pip install "mcp[cli]"
建立一個簡單的python程式來測試有沒有部署成功
from mcp.server.fastmcp import FastMCP

# Create an MCP server
mcp = FastMCP("Weather Service")

@mcp.tool()
def get_weather(location: str) -> str:
    """Get the current weather for a specified location."""
    return f"Weather in {location}: Sunny, 72°F"

@mcp.resource("weather://{location}")
def weather_resource(location: str) -> str:
    """Provide weather data as a resource."""
    return f"Weather data for {location}: Sunny, 72°F"

@mcp.prompt()
def weather_report(location: str) -> str:
    """Create a weather report prompt."""
    return f"""You are a weather reporter. Weather report for {location}?"""

# Run the server
if __name__ == "__main__":
    mcp.run()
最後開啓MCP伺服器
mcp dev your_py_file.py
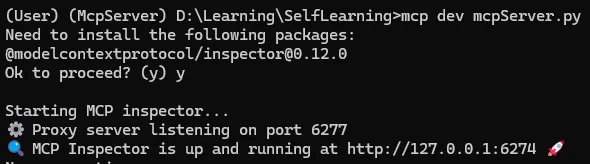
就會有一個localhost的link,複製到瀏覽器開啓,就會進入下面的畫面
使用MCP Inspector 當作Server端
參考資料
- Tools — Model Context Protocol. https://modelcontextprotocol.io/docs/concepts/tools
- Prompts — Model Context Protocol. https://modelcontextprotocol.io/docs/concepts/prompts
- MCP 101: An Introduction to Model Context Protocol — DigitalOcean Community. https://www.digitalocean.com/community/tutorials/model-context-protocol
- Flipping the Flow: How MCP Sampling Lets Servers Ask the AI for Help — WorkOS Blog. https://workos.com/blog/mcp-sampling
- How to Build an MCP Server in Python: A Complete Guide — Scrapfly. https://scrapfly.io/blog/how-to-build-an-mcp-server-in-python-a-complete-guide/
- Inspector — Model Context Protocol Documentation. https://modelcontextprotocol.io/docs/tools/inspector
- MCP Server in Python — Everything I Wish I’d Known on Day One — DigitalOcean. https://www.digitalocean.com/community/tutorials/mcp-server-python
- MCP Server with Python and Anaconda — YouTube. https://www.youtube.com/watch?v=9apykCAH04o
- modelcontextprotocol/inspector — GitHub Repository. https://github.com/modelcontextprotocol/inspector
- Model Context Protocol (MCP): A Guide With Demo Project — DataCamp. https://www.datacamp.com/tutorial/mcp-model-context-protocol
- Hugging Face MCP Course MCP capabilities https://huggingface.co/learn/mcp-course/unit1/capabilities